Thursday, May 31, 2012

Memorial Day Weekend Gardening...    

May 26... I planted the potatoes and onions.  


Kind of as a last minute decision, I decided to plant a few potatoes and onions.  I saw some Walla Walla onion seedlings at a local nursery and the the owner of the nursery said that he plants them every year and they do well here... so I decided to plant some.


I had not been intending to plant potatoes.  I used to grow them when I lived in Idaho and enjoyed the taste of really fresh new potatoes.  With the garden space that I had planned out I wasn't sure I had the space to devote to them.  However, I had been reading online about different kinds of potatoes and was intrigued when I read about the Makah Ozette potato.  


The Makah Ozette potato came from Peru by  way of Spanish explorers to the Makah Indians at Neah Bay, Washington in the late 1700's.  Apparently they have been growing this potato in their private gardens ever since.  It is considered a fingerling potato since it is pretty small.  I had never heard of it before and I was so interested in the story behind the potato, that I decided to plant a few.  


I searched online and it was not that easy to find a source!  One of my favorite seed companies, Nichols Garden Seeds in Oregon was sold out, as were other companies.  Finally I found some and ordered one pound.  


Here is how I planted them.


First I dug a trench for the potatoes.  


Then I sprinkled in some 10-10-10 fertilizer. 


 Then added a little more soil back in and placed the potatoes on top... spacing them about 9" apart.  


Then I covered them over with about 3" of soil.  


I bought the Wall Walla onion starts, already planted in a four-pack, from Adams nursery in Williston, Vermont.  


I dug in some of the 10-10-10 fertilizer into the area where I was going to plant the onions.  Then after I smoothed it all over with a rake I planted the little tiny onions. 


Here's what the bed looked like after the potatoes and onions were planted.


This Girl Gardens!


Wednesday, May 23, 2012

The raspberries are in their bed...


The big push today was to get the raspberries planted in their bed!  

I spread 2" of organic compost evenly over the top of the soil and added another 2" of the soil-compost mix that I have been using in the raised garden beds.

Then I dug it all in, turning it over.  The first time through, with every shovelful, I uncovered many more rocks.  I removed them and also broke up any hard clods of dirt.  Then I repeated the procedure turning it all over a second time.  This time, I could tell the compost had become more incorporated into the soil.  There were no more clods and the soil seemed very light.  

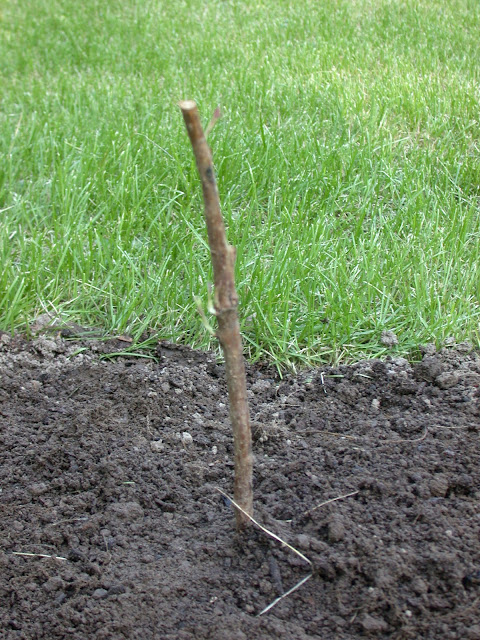
I measured off the area and began to plant the raspberry canes 24" apart and at the same depth they had been in the nursery.  Then I watered them in real well.  


Here is what they look like!  You can see that the canes look pretty much like sticks.  But some of them have buds that have already sprouted little branches and leaves.  Soon the canes will become acclimated and send out new roots and then branches and leaves.  


Clearing the way...             


May 22, 2012


Wow!  The garden grows rapidly.  Seedlings planted indoors are sprouting!  Squash, melon and cucumber seedlings are sprouted. 


The peas planted in April are already 6" tall.  the radishes are ready to be thinned and the lettuce is just about ready for me to either thin or cut... depending on how large a leaf I intend to eat!


The May planting is growing just as well!  peas are 4" tall and radishes are doing well.  I planted a different lettuce mixture... mesclun mix... in May and it is coming up... all the different colors are really nice!  


 On a householder's note...  Today I swept all the cobwebs down from the west side of the house.... all the way from the gutters, the eaves, down the siding, down to the foundation.  Then I washed all the windows, found all the screens, vacuumed them all and installed them!  Now the air is circulating freely and makes the house very pleasant inside!  It is good to clear the cobwebs, increase clarity and improve circulation


May 21, 2012


Last winter we were wishing we had some nice juicy berries.  We did go to the store and buy some raspberries from California and strawberries from Florida.  They were yummy and we decided to grow some.  We had planted five blueberry plants last summer, and are hoping to get a handful of blueberries this year.  Now we are thinking of raspberries and strawberries ... some of our favorite fruits!  I ordered a dozen Heritage raspberry plants and 50 Ozark Beauty strawberry plants from Miller's Nursery in Canadaigua, New York.  They guarantee that their berries are virus free.  The company said they would not ship until it was the perfect planting time... they just arrived last week, so it must be perfect timing.  They arrived all wrapped up in plastic.  The raspberry canes looked like a bunch of sticks with a leaf or two just starting.  


Here is what they look like in the package.  


I spent much of the day planning out the new raspberry bed.  First I looked around at the part of the yard that is not already under cultivation.  Then I looked for the sunniest spot!  It appears that the west side of the property is the sunniest!  I located the rebar that identified the west corners of the property.  I attached string to them and pulled it taut so that I could see where the property line was.  Then I measured 5 feet in from the property line.  I removed a strip of sod 2 feet wide and 25 feet long.  I encountered lots of rock and a rather large anthill.  


Here is what that area looks like now.  


Next step will be to add compost and then plant the raspberries.

Sunday, May 20, 2012

Weekend gardening

Today was predicted to be a high of 88 degrees!  Therefore, I am taking the baby tomato, pepper and tomatillo plants out for some sunshine again today! Getting them ready to sink their feet and toes into real garden soil!  


Yesterday was the first day I took them out for some sunshine.  This is known as "hardening off".  

The plants can suffer from transplant shock if they are suddenly taken from the indoors and planted outdoors in the hot sun.  It is better to do this gradually.  Let them get used to the warm temperatures, the sunshine and the breezes over a few days.  Then they will be strong and able to acclimate quicker.  


I worked on filling those other raised bed frames and got them finished!  Now they are all ready to plant!


May 19, 2012


I planted some flowers in pots and hanging baskets.


Here's what they look like.


Tuesday, May 15, 2012

Second crop is already coming up!        

I was totally amazed to see the peas which I planted on May 10th and the lettuce and radishes which I planted on May 11th... starting to come up!  Wow!  That was quick!

See the little pea.....


the lettuce....


and the radishes....


That is it for today!  I have alot of cleanup to do!

I transplanted the little tomato and pepper seedlings....       

I transplanted the tomatoes on Saturday May 12th and the peppers today, May 15th.  

They had their second set of leaves and I transplanted them into 3" peat pots.  As I gently nudged them loose from their tiny plastic cells, I could see that they had already developed extensive root systems.  I set each one on a small mound of good potting soil, in the new little peat pot so that it would end up at the same soil level it was in the tiny plastic cell.  Then I filled in around with some more good potting soil.  Right after transplanting them they seemed a little unsure of their new peat pot homes. I gave them a good drink of water and set them back under the grow light.  

 I gave the tomatoes a couple of days and then I used a pair of scissors and cut off all but the strongest plant in each pot.  


It will take the peppers a day or two to acclimate to their new spacious pots!  In a couple of days I will  remove the weaker pepper plants, leaving only the strongest one in each pot.  


I also planted squash and pumpkins today.  I planted them in 3" peat pots that I set in a 11" x 22" tray.  Then I watered them.  I feel like I should've gotten these planted about two weeks ago!  

Here they are...


I filled two more raised bed frames...     

with soil.  

This actually happened on Sunday May 13, 2012.

First I lined each raised bed frame with four layers of corrugated cardboard that I got from the recycle (landfill).  The cardboard smothers out the grass and weeds and will eventually decompose.  

Here is a picture of the raised bed frame with layers of cardboard in the bottom.  The bricks and pavers are in there just to hold the cardboard down in case there is some wind.

Next I used a shovel and wheelbarrow and moved the dirt from the pile over to the raised bed frame.  

There's the pile of soil, and the implements to move it! 


It took 6 wheelbarrow load of soil to fill each frame... and each load was approximately 30 shovel fulls!  

Here's what the beds look like now!


Sunday, May 13, 2012

Peas were up!   

The peas came up in about two weeks and have been steadily growing.  The radishes also came up fairly quickly.  The spinach, lettuce and beets took a few days longer. 

Here is what they looked like yesterday... May 12


Here's a close-up of the peas... you can see the radishes in the background.


In January and February I started selecting the seeds...       

I usually get some garden seeds from the local home improvement store or hardware store, but I also shop online and from seed catalogs.  The local stores usually have a good selection of all around generally popular varieties.  


A short digression here... 
I remember the first time that I looked at the seed rack in the store.  It was mind boggling!  I had no idea there were so many different varieties of tomatoes, peppers, etc.  I remember thinking, "Why don't they just have one kind of tomato!"  Little did I know!


I got some seed catalogs and my mind was like a sponge... I soon began to absorb a lot of information; I began to learn about all the different kinds of vegetables and varieties!  One year I managed to get seedlings of fifty different kinds of tomato plants!  I had to create a huge garden for this, but I wanted to test drive them... so to speak!  I Loved that experiment!  My family had purple, red, orange, streaked, green, hollow, yellow, cherry, currant, beefsteak and every kind of tomato you could think of.  It was a great way to taste the different varieties and decide which ones I really liked! 


So... in February of this year I purchased seeds locally and I ordered seeds from some of my favorite seed companies.  Nichols Garden seeds in Oregon, Pinetree Garden seeds in Maine, Territorial garden seeds in Washington... to name a few.  I also made sure that I bought a small packet of bean and pea inoculant (I will explain this later).  


Some vegetables, like peas and lettuce, like cooler weather.  These seeds can be sown outdoors early in the Spring.  Other vegetables, like peppers and tomatoes are very cold sensitive and cannot be grown very successfully unless one starts them indoors in cooler climates.  


I probably could have started the tomato and pepper seeds sooner, but having just moved into this house and still not having everything put away yet, I still have quite a bit of disorganization about and I was searching for the best place to locate my seed starting endeavors.  I settled on the sunniest window in the house... a South facing window.  


I planted the tomato and pepper seeds indoors on April 17th.  They came up in about 7 days.  But they got really "leggy".... meaning, their stems were getting tall and they had almost no leaves!  I realized that even though I had them in the window, they were not getting enough light!  So I bought a 4 foot fluorescent shop light fixture and two fluorescent grow-light bulbs.  I set that up over the seedlings and within a couple of days the seedlings responded by putting on more leaves instead of lengthening their stems!


On April 19th I put my Cascadia snap peas in a small custard cup and covered them with water to soak over night.... this helps them sprout.  Only soak them overnight because if you soak them too long, they will spoil.


Here is a picture of the peas seeds soaking overnight.


On April 20th the seeds had absorbed quite a bit of the water.  I gently drained the excess water off and then sprinkled the seeds with a little bit of the garden inoculant (it looks like black dust). I gently stirred them around until the seeds were pretty much all coated with the black inoculant.  


Here is what they looked like.


So then I followed the instruction on the seed packet and planted them in a row, 1 inch deep and 2 inches apart.  I still had seeds left... enough for two more rows... so I planted them. The packet said that the rows should be 18" apart, so I made sure that I measured that when I planted each successive row.  So, I ended up planting 3 eight-foot rows of Cascadia snap peas.  


When I lived in Idaho, we had a St. Patrick's day target for pea planting.  I am new to New England, so I didn't plant that early... though I think I could have planted a bit earlier than I did.  


The seed inoculant is only for bean and pea seeds.  It is a natural Rhyzobium bacteria that improves the germination and growth of the beans and peas.  It is expensive, but a little goes a long way.  I only buy one package of the stuff each year and it lasts all season.  DO NOT use it on other seeds... it isn't necessary for those other seeds, doesn't help those other seeds to sprout, so it would be a waste of money to use it on seeds other than beans and peas.  


On April 21st, following the instructions on the seed packets, I planted a row of radishes, a row of spinach a row of lettuce and a row of beets.  We had cloudy and rainy weather for the next week so I didn't have to worry about watering the seeds.  If it hadn't been rainy, I would've used the garden hose and sprinkled the area gently so that the seeds could sprout.

I moved to New England last summer ...

and started this garden.  I was very late getting it planted. Probably not until September!  Since it is tough to grow vegetables in the shade... and we have lots of maple trees and pine trees shading the yard... I looked for the sunniest spot in the yard!  I tried digging in that area and discovered that the soil is thin and there are many, many rocks.  My boyfriend suggested raised garden beds.  So, we purchased 2"x6"x8' boards and built 4 raised garden beds.  Three of the beds are 4'x8' and the last garden bed is 4'x4'.  I purchased some leftover tomato, pepper and squash seedlings from a few nurseries and got them planted and also I planted some radishes and green beans with seeds from the local home improvement store.  I ended up with a few tomatoes, a few peppers, a few squash, some great radishes and a good one-time crop of green beans.


If this had been my first time gardening, I might have given it up!  But my past experience told me that I really needed to get the garden going earlier... with some healthier vegetable seedlings... and so that was my plan for 2012.

Here is a picture of the vegetable garden covered in snow... the winter of 2011.

Starting the garden blog

I have been a gardener for the majority of my life!  First when I was a kid, growing up on a farm and ranch and later as a young adult, in college and after getting married.  A friend thought that I should start a blog to help other people learn how to garden.